Restringing Your Guitar
Strings are subject to a lot of wear and tear. They collect oil and grime from your fingers, they are constantly being plucked, slapped, fretted, or bent, and they’re under enough tension to gently bow the neck of your electric guitar. Eventually, they are going to sound dull or flubby because they have lost some of their original springy qualities, and they just don’t stay in tune, or they start to rust. After about 100 hours of playing, you’ll probably want to change your strings — even if you don’t notice the obvious signs of string wear, your tone and playability may be slowly getting worse and you don’t want to break a string right in the crescendo of a solo.
You’ll need a small wire cutter to do this neatly and safely, as well as a workspace where you can lay your guitar down without fear of knocking it off the table. A neck stand to make it easier to reach the tuning pegs and balance your guitar on your work surface is helpful, as is a winding tool to make it easier to take up the slack in new strings – they are good tools but not required.
Check Thrice
First, check to see which side of the tuning pegs the strings are wound from. This isn’t as pointless as internet memes about paper towels or toilet paper winding direction; it’s important to avoid putting too much stress on the pegs, headstock, neck, and nut. Generally, the strings will always wind from the side of the peg closer to the center of the fretboard if you have tuning pegs on both sides of the headstock; if they’re all on one side then they tend to wind from the “bottom” (if you’re holding the guitar then the bottom is the higher string side of the neck). Take a picture with your phone if you want a reference. Second, loosen all of the strings. This is critically important — you don’t want to snip a string under tension as the end is likely to whip a bit and can cause an injury to you, someone watching, or the finish on your guitar. Unwind the strings until they are nice and loose. Third, use your wire cutter to clip each string above the bridge. Again, be careful around fingers and finish; sharp metal instruments and steel string ends are not friendly to either. Gently pull the ball end of the string out of the bridge, and unwind the longer loose string segments from the tuning pegs.
Measure Twice, Then Cut Nice
Thread each new string through the bridge (making sure you get them in the right order; the individual sleeves should be labeled and the ball end will be color-coded). Measure about one and a half tuning pegs past the tuning peg for that string, and put a 90-degree bend in the string. As you reach the tuning pegs further from the nut, you’ll be cutting the strings progressively longer, so make sure you do this on a per-string, per-peg basis. Cut the string about half an inch past the bend. You may find that the first time you string your guitar, you go too long (you can try to re-bend and clip again) or too short (you’re going to have to start over with a new string, and the only way you’ll find out is when the string keeps slipping off the tuning peg). Winding a string that is cut too long onto the tuning peg will result in too many wraps around the peg, and either the string will slip or you’ll cut through the lower wraps. This is particularly true for bass strings that have a thinner core; if you wrap the wound part of the string too much you’ll end up separating the wraps and the string will unravel as you tune it! The one and a half peg rule of thumb is just that — it accounts for the differences in the diameter of the tuning pegs. For example: bass guitars tend to have heavy pegs, spaced further apart, and while only 3 or so wraps are needed to lock the string in place, each wrap takes up a lot of string due to the size of the peg.
Crank It Up
Press the half-inch string stub into either the small hole in the tuning peg or into the slot in the top of the peg, make sure the string itself is slotted in the nut nicely, and if you have a string tree (those little guides between nut and peg) ensure the string slides under the tree as well. Provide a little tension by pulling on the string around the 3rd or 4th fret as you wind the tuning peg to take up the slack. It’s important that your windings are even and do not overlap. If you’re stringing a bass or one of the lower strings on your guitar, you may want to push the ball end of the string back through the bridge (so there’s some string showing between the ball end and the bridge); this lets the string twist around as you add tension. If you’ve ever tried winding up a long extension cord and find that the plug end keeps tangling or twisting, you’re eliminating the same effect (and potential tension on the string) here.
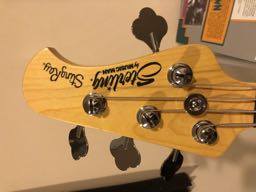
(This Music Man bass has tuning pegs with a slot for the thicker bass strings. There is a single tuner on the lower side of the headstock; note that the strings wind from the side of the peg opposite the knobs. The A and D strings also sit under a tree to keep them slotted well in the nut and to avoid riding up as they’re tensioned).
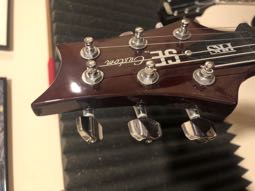
(The PRS guitar headstock has tuners on both sides, again, the strings wind from the side opposite the knobs. These pegs have holes for the bent end of the string; watch your fingers as you wind as the cut ends can be sharp.)
Get In Tune
Once you’ve replaced all of the strings, start tuning your guitar as we covered previously. You may have to tune and re-tune your strings as they stretch a bit, and as you re-introduce tension to the neck. Get them close, fine-tune each string, then try playing one-string scales up and down and see if the new strings stretch a bit; you may have to adjust a bit as the strings and neck settle back into a nice happy setup.
That’s it — it takes practice to build up the confidence and comfort level with the length of the string tail and a number of winds that balance the tension on the string and tuning peg, so consider doing your first few practice setups with less expensive strings. String setup is the more common and easy part of taking care of your guitar. You also want to make sure each fret produces the right note, and that you find the strings comfortably close (but not too close) to the fretboard so you can play without strain and tackle those crazy runs up and down the neck. Next up we’ll explain how intonation works, why your frets keep getting closer as you go up the neck, and when you’re going to have to make adjustments to the neck itself.
Until then – loudness is goodness, and nicely strung and properly tuned loudness is even better.
