Intonation, Action, and Neck Issues
Getting the open strings tuned to the right notes is only part of the full setup. You also want to make sure you’re getting the right notes, in tune, on every fret, or you’ll be drifting in and out of tune as you play in various positions on the neck. You also want the guitar to feel as comfortable as possible, with a nice action on the strings so you aren’t cramping your hands or literally bending strings out of tune, but you also don’t want to hear fret buzz from strings that are set too low.
There are only three things that control the action and intonation on guitar: the slight upward curve of the neck (called “bow”) caused by the tension of those strings pulling on the headstock, the saddle height adjustments on your bridge, and the saddle in/out adjustments that make small changes to the string length. Sound like a lot? It is, but let’s go back to the basics of Part 1: A string’s note depends on the weight of the string and the string’s length. We’re going to adjust for length to get our guitars sounding and playing well.
Adjusting for intonation and action should give you three benefits of playing: comfortable string height above the neck, perfect pitch up and down the neck, and no fret buzz anywhere you play on the neck.
Action and Intonation
Action has a very large impact on intonation because you’re effectively bending the string (changing its length a little) when you press it against a fret. You may be wondering how upright bass players manage intonation with the action set so high – it’s a learning process to determine where each note is on the neck and you’ll usually hear some angry orchestra conductor yelling at the strings when they get tired and sloppy with finding the right intonation for each note. On our electric instruments, we’re dealing with a relatively low action height, but we do need to manage
First, we need a little math detour (you knew that was coming). Remember how a string’s sound goes up an octave if you make the string half as long, and down an octave for a string that’s twice as long? That means that playing the 12th fret on your guitar should make the string half as long – the 12th fret should be exactly halfway between nut and bridge saddle. The frets can’t move around so we adjust intonation by moving the string itself (adjust the action up or down) and by moving the bridge saddles in or out to make the string slightly longer or shorter. If you’re playing the guitar with 24 or more frets, the 24th fret should be two octaves up, and the 24th fret to bridge is ¼ of the total string length. That’s also why string action impacts the intonation – even if the nut-12th fret-bridge lengths are perfect, if you have to really bend the string down to the fret, you’ve changed some of those measurements on the string itself.
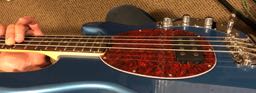
(Checking intonation at the 12th fret. The string should be exactly divided between the nut and bridge saddles here; you can see the saddles have a little room to ride to make up for funky intonation issues).
We’re going to assume that you’re happy with the string action (nice, consistent height above the frets) and that you aren’t hearing fret buzz when you’re playing below the 6th or 7th fret. If you have either of those issues – you fret a string at the 2nd fret and hear it buzzing a few frets away, or your strings feel like you’re playing an upright bass and have to press them down a full finger width, skip ahead to Part 4 on Neck Adjustments, then come back here to finish up the setup with intonation and saddle height adjustments.
Getting Rid Of The Buzz
If you made it this far: you’re happy with the action. You don’t have fret buzz on the frets closest to the nut. You may be getting a little fret buzz up the neck (say, 12th fret or higher), or you hear that your open strings are in tune but at the 12th fret, you’re a little off. It’s time for some saddle adjustments.
Expect to do a little dance with tools and tuners as you make final adjustments. Each time you adjust string length with the saddles, you’re making small changes to action; when you adjust saddle height you’re also changing the string length. The good rule of thumb (or thumb and forefinger) is to make a small change (quarter-turn of any screw), re-tune and play, then make other small changes.
Start by eliminating fret buzz. If you’re hearing that metallic rubbing sound up above the 12th fret, slowly raise the saddle height to pick up the bridge end of the string (if your fret buzz is on the lower frets, closer to the nut, then you may not have enough bow in the neck, which is another set of adjustments). First, loosen the string with the buzz a bit to relieve the tension and made it easier to adjust the saddles.
You’ll see small Allen screws in the saddles: turning them to the right (righty-tighty) will raise the saddles. If those screw heads are already pretty far down into the saddles, then raising the saddle height won’t help – you need to adjust the neck bow to raise the strings off the frets and should skip ahead to Part 4. Again – small adjustments are helpful but if they don’t solve the problem, look at the bigger picture of the neck and bridge together.
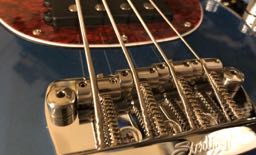
(Saddle height adjustments. I like low action and have a full-scale, relatively straight neck, so I raise the saddles a little to get rid of fret buzz on the higher frets).
Once you’ve adjusted the saddle height, re-tune your guitar, and see if the fret buzz issue is resolved. If not, try another small turn or 2 (or 3 or 4) until you are happy with the playability.
Sliding The Saddles: Fine-Tuning the Tuning
When you’ve made the action comfortable, and no longer have fret buzz, you can finish up with minor intonation adjustments by moving the bridge saddles. Again, loosen the string with the intonation issues, and then use a small screwdriver to adjust the saddle. Tightening the saddle (turning screw to the right) makes the string longer, and adjusts for a string that’s sharp on the 12th fret. Loosening the saddle makes the string shorter by letting the saddle slide closer to the nut end of the neck and will help with a slightly flat string. Note that this is exactly the opposite of how the tuning pegs work (tighter = shorter = sharper). Again, small, ¼ turn adjustments are key, slide the saddle, make sure the strings are seated in them properly, retune the open string, and then check the 12th fret intonation.
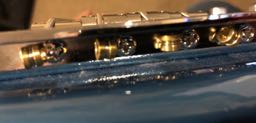
(The saddle adjustment screws at the tail end of the bridge. Be careful going in there with tools, you don’t want to nick your finish. Also, make sure you loosen the strings before adjusting the saddles, so you aren’t fighting the tension on the string and increase the likelihood that you slip with a pointed tool)
So far we’ve changed strings, tuned them, checked for the simple signs of bad intonation or action, and adjusted as much as we can. You will find cases where, no matter how many small adjustments you make, you can’t get the fret buzz on the nut end of the neck to resolve, or you are fighting with strings that are so far off the fretboard that you’re practically wrestling them down to the frets, and you can’t get anything close to good intonation as a result. If you have these issues (asking for a friend, of course) then it’s on to the last part of our setup series where we will make neck adjustments.
Until then – stay in tune on the straight and narrow (The Who)!
