Dealing With Pains In The Neck
Stringing a guitar with steel strings and bringing them into tune puts a lot of strain on the headstock and upper part of the neck. The lower end of the neck is bolted to the body, or maybe glued to the body in a thru-neck design, and isn’t going anywhere, but the upper part will bend upward as you add tension to strings. Think about talking a small piece of thin wood, standing on one end and pulling the other – the wood makes a shallow bowl shape as it bends up to meet (and relieve) the force you’re using to pull on it.
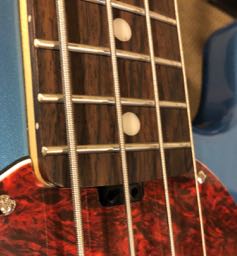
Most guitar necks have a very slight backward bow to them – the headstock actually curves down, away from the top of the body, so when you string them the neck is pulled very close to straight. On the other hand, you may have a neck that is a bit too flexible, and the strings pull it into a deeper bowl shape.
The main factor determining how much your neck bends under string tension its stiffness, which is controlled by the truss rod that runs through the neck just under the fingerboard. Think of your neck like a sponge – when it’s dried out and compressed, it’s hard to bend, but when it’s fully expanded and soft, it’s easy to curve. Adjusting the truss rod will change the stiffness of the neck, but it also changes just about everything else – playing action, string length, and sensitivity to changes in heat or humidity. As with all other setup work, small changes and lots of playing and tuning will help you find the best set points.
Changing The Action
Perhaps the most noticeable change in playability is how the string action varies as you change the neck stiffness. If your action is too low, or you’re getting fret buzz lower than the 12th fret, then the strings aren’t producing enough of a bow in the neck when they’re in tune. You’ll want to gently relax the compression on the neck – loosening the truss rod – to raise the strings off the fretboard. Similarly, if you’ve tried adjusting the saddle height to get rid of fret buzz above the 12th fret, or your saddle height screws are about to come through the bottom of the saddles, drop the saddles back down and remove some neck tension to raise the strings up a bit.
On the other hand, if your string action is too high, it’s not comfortable to fret notes, or you find you can’t set the right intonation because you have to bend the string down to that 12th fret, the strings are pulling too much on the neck and you’ll need to add stiffness to the neck by tightening the truss rod.
Truss Rod Adjustments
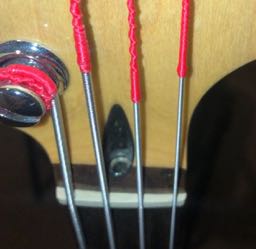
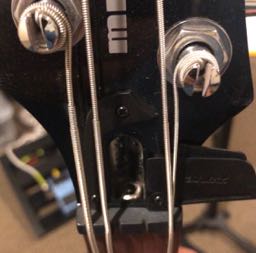
Your guitar’s truss rod may have one or two adjustment points – either at the bottom of the neck where it meets the body (like my Sterling bass) or with a hex nut that is usually under a small cover on the headstock just past the nut.
The usual rules apply – loosen the strings before making any adjustments, and make a few small adjustments to find the right balance. If you need to get the truss rod cover off the neck, you may need to loosen the strings a few turns to get enough relief to unscrew (or unhinge) the cover. Truss rods that have a body-side adjustment are usually turned with a small, wheeled hole; where you have access to the top of the neck you’ll need an Allen wrench or right angle hex driver tool to get into the recess. Some guitars – notably Rickenbackers – have a tight angle and very little clearance to the truss rod nut, so find the right tool for the job.
(This Music Man bass neck has a truss rod that adjusts with a holed wheel at the body side, the headstock is solid)
(This Fender Squire bass doesn’t have a cover over the truss rod, you can see the end of it that takes a small Allen wrench or hex driver for adjustments. There’s not a lot of room to make adjustments so small quarter-turns are the rule)
(My favorite truss rod sits behind a hinged cover on this Ibanez short-scale bass. Loosen the strings and slide the cover to get access, and the hex nut is very close to the headstock making it a bit easier to adjust.)
Remember, righty-tighty, and tighter means more neck stiffness. If you are dropping the action, tighten the truss rod; if you are relieving fret buzz, then loosen it. Quarter turns are about the most you should do at once; adjust the rod, retune the guitar, and play for a bit. If you’re making a few quarter-turn adjustments, let the guitar sit for a day or so after tuning as humidity and temperature (as always) will impact the rate at which the neck adjusts to the new tensioning.
What if you’re literally at the end of your rope (or string, or truss rod)? You’ve tried adding tension to the neck, but your action is still too high and you can’t intone the guitar properly. You feel like you’re fighting a constant battle with your tuner and no matter what, you sound like a bad cassette tape from the 70s that sat out in the sun. (I listened to some of those). Go back to Part 1: String pitch depends on weight and length. If you are bowing the neck too much, and can’t use the guitar’s natural build to counterbalance that strain, then the only thing left to change is the weight of the strings! Switch to a lighter (smaller gauge) set of strings and you won’t need to tension them quite as much, which will relieve some of the pressure on the neck and relax the action. If you’re lucky enough to play a high-end guitar without a truss rod (a Modulus Graphite bass, or an old Kramer aluminum neck guitar) string gauge is the only tool you have aside from saddle adjustments to adjust the bow of the neck.
That’s a wrap on our first Studio Series – we’ll pick up the next set of topics around how you turn those vibrating strings into amplified sounds, and the basics of shaping your guitar’s tone now that you have it producing clean, strong, and properly intonated notes.